
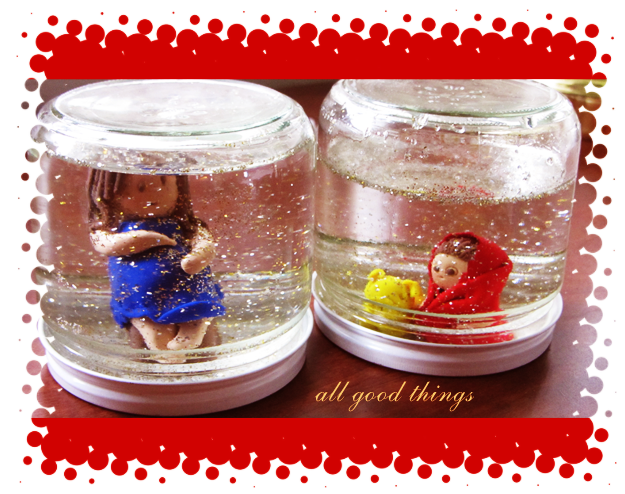
I have wanted to make these for the longest time! Snow globes are easy to make and are great gifts! Always nice to have one on your desk. This is my version of a quick and simple handmade Snow Globe.
What you will need:
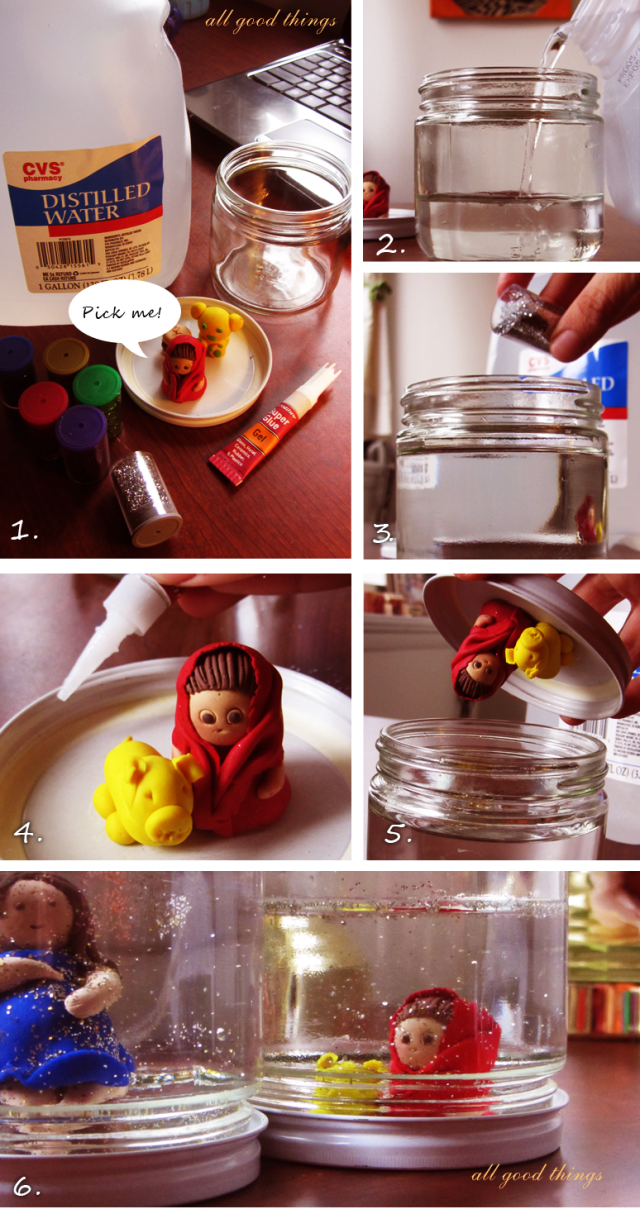
1. Empty, clean glass jar with a secure lid : It could be any size. I use empty honey jars.
2. Distilled water : This is better to use. Tap water would just turn yellow and do nasty things to your globe like growing bacteria!
3. A Plastic Figurine : I used one of my clay figurines to make them extra special. (The globe with the pregnant girl was a gift for my pregnant friend!)
4. Glitter/ Fake snow
5. Super Glue/Epoxy
6. Glycerine : I didn’t have one handy. But if you do I’d recommend using it. It will make your snow fall in slow-mo and make it look prettier!
——————————————————————————————
Let’s start!
1. Get all your supplies ready.
2. Pour distilled water into the jar. Don’t fill it up to the brim, leave a little breather.
3. Add glitter.
4. Super glue your figurine to the lid.
5. Slowly close the lid making sure you secure it tightly.
6. Shake ’em up and let it snow!


Woooow…..beautiful one Pinaz. The dollsare so cute. The idea is mind blowing. Good job.:)
Thank you Deepa!
Thank you Deepa.
this is wonderful… makes me think even I can make it 🙂
Of course you can! In fact I made one of them for Chikki.. Can’t send it through post though 😦
Your snow globes are darling.
I make some myself, so I thought I’d add a tip or two. One note: you can use *some* commercial mylar confetti shapes in white and silver. (Test by soaking overnight in liquid to see if the color holds.) Colored confettis will discolor the liquid, but you can also use them deliberately if you want a green, pink or blue tint for fun. Mylar confetti shapes sink faster than “snow” but will give a new look to the snow globes, which the kids enjoy.
You can also make them the OLD-old-fashioned way, which is putting some eggshells in a baggie, crushing them with a rolling pin. This gives a very snoft snowy effect, and different types of shells will float at different speeds.
Last tip o’ the day (I promise, but I’m rather passionate about the topic) … instead of putting your figures right on the cap lid, create a polymer clay disk first, to bring them up to the height of the jar lid. That way, none of the cuteness is lost because it’s too low in the globe.
Good luck with your future snow globes. Very fun kids’ project.
Wow! I loved the idea of the egg shells! I love using things around the house instead of going and buying them (I’m lazy). I also like the idea of creating a disc so that the figurine matches the height of the globe.
Your work is wonderful and I am honored that you stopped by and gave me some insightful tips. Thank you so much!
I bet your kids remember making these for a long, long time. 😉